posted from https://www.dumblittleman.com/tips-for-amateur-photographers/
Photography is a fantastic hobby. For some people, it’s a lifelong profession. It gives people the chance to create works of art, capture precious moments, and make lasting impressions of our world.
If you are looking at taking up photography as a hobby or have already purchased a DSLR camera, you may find the process of getting started a bit daunting. After all, photography isn’t just about “pointing and clicking”.
To help you get started, here are 7 really helpful tips for amateur photographers.
Understand how to hold your camera
This might seem like a really basic tip, but you’ll be surprised to find a lot of photographers overlooking this critical point. A DSLR camera or any advanced camera is usually heavy and bulky. There is a wrong way and a right way to hold it.
Here’s how:
- Hold the camera with both hands.
- Pull the camera close to your body and use the viewfinder.
- Ensure your elbows are tucked into your chest to provide extra support and stability. Some people simply hold their camera at arm’s length and this makes them less stable.
- Use your right hand to hold the camera grip while keeping your index finger above the shutter. Your left hand should be cupped underneath or around the base of the lens.
Most importantly, ensure that you are comfortable!
Consider the importance of light
Light is one of the most important factors to consider when taking a photo. A digital camera has a sensor. This sensor is exposed to light when the shutter button is pressed and makes an imprint to create the photo. If too much light hits the sensor, the photo will be over-exposed. Alternatively, if not enough light hits the sensor, the photo will be under-exposed.
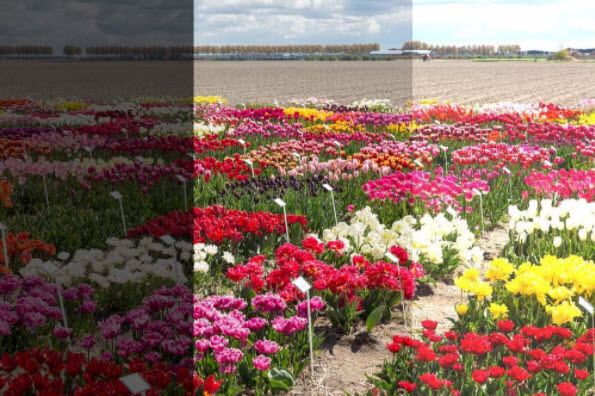
Underexposed, normally exposed and overexposed photo
Note: Sometimes, photos with different exposures are taken on purpose for HDR photos
Try to look at the light balance in a photo and consider manually changing the exposure. If there are any predominantly light areas, lower the exposure. Conversely, if there are any darker areas, consider increasing the exposure. If you cannot get your exposure levels right, you can always alter them using a post-processing software.
Light also creates depth and can turn a plain photo into something special. Keep in mind that natural sunlight can provide beautiful highlights and add definition to objects. On the flip side, a lack of light can create haunting silhouettes and interesting shadows. Make sure to use light to your advantage!
Learn the various functions of your camera
As mentioned above, DSLR cameras have a plethora of buttons, features, and settings. Before you even start taking photos, it is advisable to have an extensive play with your camera. Read the manual, test out the buttons, and try manually altering the focus.
You should also dissect your camera menus. Find out how to change your image settings, how to format your memory card, and how to switch between single and multi-shot.
It is also advisable to be fully aware of how each part of your camera works.
Where does the battery pack go and how does it slot in? Where does the memory card slot in? How do you swap camera lenses or attach a flash device?
As the saying goes, knowledge is power!
Do not use flash excessively
Flash in photography can be truly frustrating. Most new photographers will simply use their flash to take low light photos and wonder why the results are poor.
It is important to remember these simple pointers:
- DSLR cameras can take much better low-light photographs without the need to use flash.
- Using flash to illuminate a dark photo will generally result in an overly bright and harsh concentration of light around your subject.
- Use flash sparingly and when you do use flash, consider changing the flash settings to tone down the light intensity to try and create a softer effect.
Learn how to focus
To create clear and sharp photos, you must understand how to focus on an object or a particular part of an image. A DSLR will usually have a series of focus points on the viewfinder, which is usually small white squares.
If you half-press the shutter button, some of the focus points will turn green. Those green points are where your camera is focused on. Depending on the aperture, it’s what will appear “in-focus” in the photo.

Note: Blurred photos can also be taken on purpose – for example, to create bokeh effect
Most DSLR cameras have an auto and manual focus feature. To manually focus your camera, you usually have to twist part of the lens. As you twist it, the focus will move forward or backward. Take time to test both the manual and auto focus features and get accustomed to how they work.
Consider the composition of your photograph
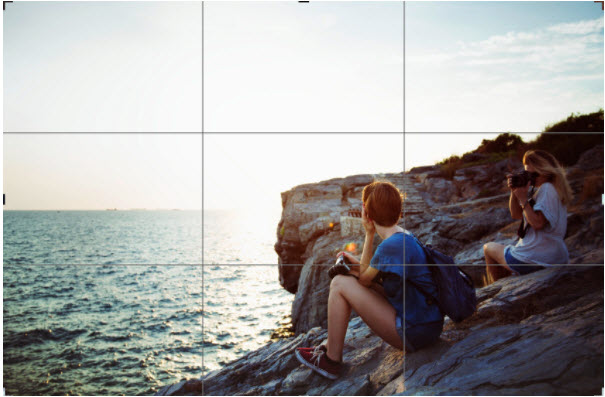
Image composition can turn an OK photo into something spectacular. There are several rules and pointers to remember when composing your photo. For example, there is the rule of thirds.
This means that if you are shooting an object, it should be positioned in the left or right third of your photo horizontally and the top or bottom third vertically.
Another rule says to consider making use of leading lines. Look for any sort of flow or lines within your photo that directs your eye towards a particular area or object. Make use of leading lines to naturally draw attention to parts of your photo and to make it easy to follow. For example, leading lines can be found on the sidewalk or pavement of a road leading off into the distance.

Roads are one of the most obvious examples
Learn how to perform basic post-processing
Many beginners believe that once you have taken a photo, that is it. You can’t do anything to fix or improve it.
However, in today’s modern world, we have plenty of post-processing programs, such as Photoshop, Luminar, or GIMP, which allow users to edit their photos and improve their quality ten-fold.
You can change the white balance and exposure and also improve color saturation. You can also re-position photos that were mistakenly taken at an angle. In short, you can use a post-processing software to salvage photos you felt were unusable and add that finishing touch to your work.
We hope you have found these tips for amateur photographers both insightful and interesting. Photography is a fun hobby and once you understand the basics, the quality of your work should improve!
The post 7 Tips For Amateur Photographers You Need To Know appeared first on Dumb Little Man.